---
title: "Aging in Place Bathroom Remodel: 2026 Planning Guide"
description: Plan an aging in place bathroom remodel step by step for 2026 — layout, curbless showers, grab bar blocking, comfort-height toilets, and what to sequence first.
image: https://hgiremodeling.com/hubfs/Screenshot%202026-08-10%20at%203.56.12%20PM.png
---
"
[](https://hgiremodeling.com)
- [Home](https://hgiremodeling.com)
- [About Us](https://hgiremodeling.com/about)
- [Service Area](https://hgiremodeling.com/service-area)
- [Services](https://hgiremodeling.com/services)
- [Kitchen Remodels](https://hgiremodeling.com/kitchen-remodeling-spring-tx)
- [Bathroom Remodels](https://hgiremodeling.com/bathroom-remodeling-spring-tx)
- [Whole Home Remodeling](https://hgiremodeling.com/home-remodeling-spring-tx)
- [Outdoor Kitchens](https://hgiremodeling.com/outdoor-kitchens-spring-tx)
- [Outdoor Patios](https://hgiremodeling.com/outdoor-patios-spring-tx)
- [Gallery](https://hgiremodeling.com/projects)
- [HedgeFrame™](https://hgiremodeling.com/best-kitchen-and-bathroom-remodeling-in-spring)
- [Smart Resources](https://hgiremodeling.com/kitchen-and-bathroom-remodeling-guides-and-planning-resources)
- [Blog](https://hgiremodeling.com/blog)
- [Financing](https://www.hfsfinancial.net/promo/68669601c29751cc5b9dbb3f/)
[Book Now](https://hgiremodeling.com/contact)
[Book Now](https://hgiremodeling.com/contact)
Kitchen Remodeling Guide
# Aging in Place Bathroom Remodel: 2026 Planning Guide
HGI Remodeling
Free Download
[](https://hgiremodeling.com/hs/cta/wi/redirect?encryptedPayload=AVxigLImWlTvPZDv19FSnJ4nmMwc1NFUtdIpkQzCvVtdJgbYVNF9%2Fr8oDeKPOGNAJGlcGmnwE5kGnTTXMm5%2ByaJdnDkU4gUsP0YyYFIhu58iHvf5HGA2NRbsVeRU2CyJItomErX1gLTEpURk1zuMCcBh99ghq6RpNCgpfrc38Ip%2Bu4RDORXoGHU%2BJg%2FgqiddN%2Fo%3D&webInteractiveContentId=326081437383&portalId=24111776)
[Back](https://hgiremodeling.com/blog)
HGI Remodeling
[Bathroom Remodeling](https://hgiremodeling.com/blog/tag/bathroom-remodeling)
**Key Takeaways:**
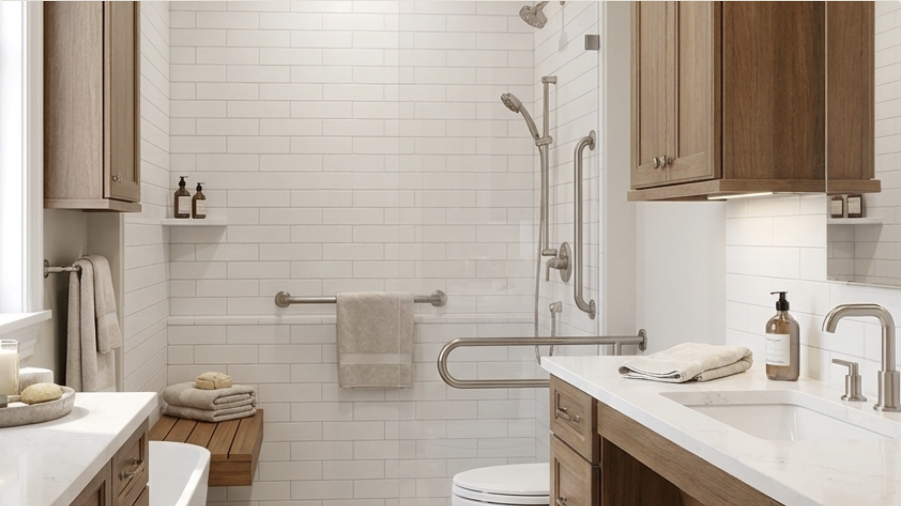
- Start an aging-in-place bathroom remodel with a curbless shower and 32-inch clear doorway before picking tile or fixtures.
- Grab bars need blocking rated for 250+ lbs, installed at rough-in, not bolted into drywall later.
- Houston-area homeowners 50+ should design-build the project so structural and accessibility changes get permitted together, not patched in after the fact.
- Budget the walk-in shower conversion and layout changes before finishes in 2026 — reversing a finished-first job costs more than doing it right once.
##### On this page
Planning an aging-in-place bathroom remodel means sequencing decisions in the right order — layout first, fixtures second, finishes last — so you don't tear out a wall twice. This guide walks through what to gather before you call a contractor and the steps that keep the project from stalling.
## Why a Beautiful Bathroom Can Still Create a Daily Safety Problem
The CDC estimates more than 234,000 nonfatal bathroom injuries land in U.S. emergency rooms every year, and the bathroom is the single most dangerous room in the house for adults over 65. Most of those injuries trace back to two things: a step-over shower threshold and a toilet that's too low. Fixing both is a layout problem, not a shopping problem — which is why the order of operations matters more than the finish selections everyone wants to jump to first.
A remodel planned for aging in place in 2026 also needs to survive the next 15-20 years without another gut renovation. That means designing past your current mobility, not just your current preferences.
## Bring These Decisions to the First Planning Meeting
- A tape measure and photos of the current bathroom's door width, shower threshold height, and toilet centerline
- A list of who uses the bathroom now and who might need it later (spouse, aging parent, future caregiver)
- A rough budget range before you meet a contractor, so the scope conversation starts from reality
- Blocking/framing plan from your contractor if walls are being opened — this is where grab bar placement gets decided
- A design-build partner who handles permitting, structural changes, and finishes under one process, since aging-in-place work almost always touches plumbing, framing, and electrical at the same time
Homeowners working with [HGI Remodeling](https://hgiremodeling.com/) typically bring photos and a wish list to the first design meeting; the contractor turns that into a layout before any tile gets picked.
## 7 Decisions That Make the Bathroom Easier to Use for Years
### 1. Measure your doorway and shower entry first
This step tells you whether you're doing a cosmetic update or a layout remodel. A doorway under 32 inches clear won't accommodate a walker or wheelchair comfortably, and a shower threshold over half an inch becomes a trip hazard as balance declines. Measure the rough opening, not the finished door slab. **Common mistake:** measuring the door slab width instead of the clear opening after the door swings open, which overstates usable width by 2-3 inches.
### 2. Decide on a curbless or low-curb shower before anything else
A curbless shower is the single highest-impact change in an aging-in-place bathroom remodel, and it has to be decided before framing, subfloor, and drain location are finalized. Converting a tub to a curbless shower usually requires lowering the subfloor or adding a linear drain to manage the slope — a change that's easy pre-drywall and expensive post-tile. **Verdict:** plan the shower pan and drain slope in the design phase, not as a change order mid-project.
### 3. Set blocking for grab bars during framing, not after
Grab bars need to anchor into solid blocking rated to hold 250+ lbs of dynamic load — a person's full body weight plus the force of a fall. Toggle bolts into drywall alone will pull out under real load. If walls are open for plumbing or electrical work, this is the point to add 2x8 or 3/4-inch plywood blocking behind the shower, near the toilet, and by the tub if one remains. **Common mistake:** skipping blocking because “we'll add a bar later” — later means cutting open finished tile.
### 4. Pick a comfort-height toilet and confirm clearance
A comfort-height toilet sits around 17-19 inches to the seat, versus roughly 15 inches for a standard toilet — that few inches makes standing up dramatically easier on aging knees and hips. Confirm at least 18 inches of clear space from the toilet centerline to any wall or vanity on at least one side, per typical ADA-adjacent guidance used in residential accessible design. **Expected outcome:** a toilet that supports independent transfers without a caregiver.
### 5. Choose slip-resistant flooring rated for wet areas
Standard glossy tile gets dangerously slick when wet. Look for a coefficient of friction (COF) rating of 0.60 or higher for wet-area floors — most porcelain and textured tile lines publish this spec, and any reputable design-build contractor should be able to pull it for the SKUs you're considering. Smaller-format tile (2x2 or mosaic) also adds grip through extra grout lines. **Common mistake:** choosing large-format tile purely for the look and finding out it's slick underfoot in year one.
### 6. Add lever handles, comfort-height vanities, and lighting last
Once the layout and floor are locked, the finish-level decisions come fast: lever-style door and faucet handles instead of knobs (easier on arthritic hands), a vanity height around 34 inches with knee clearance if a wheelchair user needs it, and layered lighting so no one is navigating a dim shower at 6 a.m. These changes don't require structural work, which is why they belong at the end of the sequence, not the start.
### 7. Sequence the permit and inspection process around structural changes
Curbless showers, subfloor lowering, and blocking additions typically require permit review in most Houston-area municipalities, while swapping a toilet or adding grab bars to existing blocking usually doesn't. Confirm with your contractor which parts of the scope trigger inspection so the timeline doesn't stall mid-project waiting on a permit that should've been pulled in week one.
## Five Issues to Catch Before Tile and Drywall Make Them Expensive
- **The shower pan won't slope correctly toward the drain.** This usually means the subfloor wasn't lowered enough during step 2 — catch it before tile goes down, not after.
- **Grab bars feel loose after installation.** They were likely anchored into drywall or a single stud instead of continuous blocking; this needs to be corrected immediately, not monitored.
- **The bathroom door still doesn't clear a walker.** Standard swing doors eat 2-3 inches of usable width even when the opening measures 32 inches; a pocket door or barn-style door solves this without widening the framed opening.
- **The new floor looks great but feels slippery when wet.** Check the COF rating against spec — a rating under 0.60 in a shower or floor area is a finish-selection error, not a cleaning problem.
- **Budget ran out before finishes.** This almost always means layout and structural work (steps 1-4) weren't budgeted first; finishes are the easiest line item to scale down, so protect the layout budget first.
## Use These Resources to Avoid Guesswork Before Construction
- Tape measure and a printed floor plan for on-site measurements
- A written blocking plan from your contractor before drywall closes
- Manufacturer spec sheets for COF ratings on any wet-area flooring under consideration
- A single design-build point of contact — coordinating a plumber, electrician, and tile setter separately is where most aging-in-place remodels lose weeks to scheduling gaps
- HGI Remodeling handles design, permitting, and construction as one process for Houston-area homeowners planning this kind of remodel in 2026
## Your Next Move: Lock the Layout Before You Choose Finishes
Once the layout, blocking, and shower conversion are decided, the rest of the project moves fast — cabinetry, tile, and fixture selection typically take 2-3 weeks once the structural scope is locked. Get the layout right first; everything downstream depends on it.
## Answers to the Aging-in-Place Questions Homeowners Ask First
### What is an aging-in-place bathroom remodel?
An aging-in-place bathroom remodel changes a bathroom's layout and fixtures so it stays safe and usable as mobility declines with age. It typically includes a curbless shower, grab bar blocking, a comfort-height toilet, and slip-resistant flooring.
### How much does an aging-in-place bathroom remodel cost in 2026?
Cost depends heavily on whether the shower is being converted to curbless and whether subfloor or plumbing has to move, since those are the most labor-intensive parts of the job. Get a scoped quote from a design-build contractor rather than estimating from a national average, since layout changes swing the number significantly.
### Do grab bars need to be installed during construction?
Grab bars need continuous wall blocking behind them to hold real load, and that blocking has to go in while the wall is open. Adding a grab bar to a finished wall without blocking risks it pulling out under weight.
### Is a curbless shower necessary for aging in place?
A curbless or low-curb shower removes the single biggest fall hazard in a bathroom, the step-over threshold. It's not strictly required, but it's the highest-impact single change in a bathroom built for aging in place.
### What height should a comfort-height toilet be?
Comfort-height toilets sit around 17-19 inches to the seat, compared to roughly 15 inches on a standard toilet. The added height makes standing and sitting significantly easier for aging knees and hips.
### Can I add aging-in-place features to an existing bathroom without a full remodel?
Non-structural items like lever handles, grab bars into existing blocking, and a toilet swap can happen without a full remodel. Layout changes like a curbless shower or a wider doorway require opening walls and floor, which means a fuller renovation.
### What flooring is safest for an aging-in-place bathroom?
Look for wet-area flooring rated at a coefficient of friction (COF) of 0.60 or higher, and favor smaller tile formats for extra grip from grout lines. Large-format glossy tile looks clean but gets dangerously slick when wet.
### How long does an aging-in-place bathroom remodel take?
Once the layout, blocking, and shower conversion scope is locked, cabinetry, tile, and fixture work typically takes 2-3 weeks. The layout and permitting phase before that varies by whether the project requires subfloor or structural changes.
## The Door-Swing Detail That Can Steal the Space You Need
The detail most homeowners skip is doorway swing direction — a door that swings into the bathroom eats floor space a walker or wheelchair needs to turn. Swapping it to swing outward, or switching to a pocket door, costs far less than widening the framed opening and often solves the clearance problem outright.
[](https://hgiremodeling.com/hs/cta/wi/redirect?encryptedPayload=AVxigLKc0SCTEpcOmYSzAwbGeY7XQwIjJPgpm7064iLxdxS6eFjbscoTdOtSjqFfKSwjjhQOzPLYkKUF%2F%2FRrKKn%2Fa%2BSxvzlUCeERlu0dBsTUN4FERmQZOLhUr2pjfiHcspg3t%2BK3x4hOOcgBEwwkUWibqtGglrzHHx%2BPPbd9BIbSNush8bG0DVRtBh8TVj18OtE%3D&webInteractiveContentId=326364223191&portalId=24111776)
- [Author](https://hgiremodeling.com/blog/how-to-plan-an-aging-in-place-bathroom-remodel#abh_about)
- [Recent Posts](https://hgiremodeling.com/blog/how-to-plan-an-aging-in-place-bathroom-remodel#abh_posts)
[](https://hgiremodeling.com/blog/author/hgi)
[HGI Remodeling](https://hgiremodeling.com/blog/author/hgi)
We’re Aleks and Nanoo — partners in life and in remodeling. We’ve seen that most remodeling stress begins long before construction, often in the early decisions that feel unclear or overwhelming. Here, we share practical perspective drawn from real experience to help homeowners move forward with clarity and confidence.
[](https://hgiremodeling.com/blog/author/hgi)
Latest posts by HGI Remodeling ([see all](https://hgiremodeling.com/blog/author/hgi))
- [How to plan an aging-in-place bathroom remodel](https://hgiremodeling.com/blog/how-to-plan-an-aging-in-place-bathroom-remodel) - August 10, 2026
- [How to Find a Reliable Remodeling Contractor & What Most Homeowners Miss](https://hgiremodeling.com/blog/how-to-find-a-reliable-kitchen-remodeling-contractor-you-can-trust) - March 25, 2026
- [Bathroom Remodel Checklist & Planning Tips](https://hgiremodeling.com/blog/bathroom-remodel-checklist-for-greater-houston-tx-homeowners) - March 19, 2026
[](https://hgiremodeling.com)
- [Home](https://hgiremodeling.com)
- [About Us](https://hgiremodeling.com/about)
- [Services](https://hgiremodeling.com/services)
- [Gallery](https://hgiremodeling.com/projects)
- [HedgeFrame™](https://hgiremodeling.com/best-kitchen-and-bathroom-remodeling-in-spring)
- [Service Area](https://hgiremodeling.com/service-area)
- [Contact Us](https://hgiremodeling.com/contact)
- [Blog](https://hgiremodeling.com/blog)
- [Privacy Policy](https://hgiremodeling.com/privacy-policy)
- [Terms of Service](https://hgiremodeling.com/tos)
- Services
- [Kitchen Remodels](https://hgiremodeling.com/kitchen-remodeling-spring-tx)
- [Bathroom Remodels](https://hgiremodeling.com/bathroom-remodeling-spring-tx)
- [Home Remodeling](https://hgiremodeling.com/home-remodeling-spring-tx)
- [Outdoor Patios](https://hgiremodeling.com/outdoor-patios-spring-tx)
- [Outdoor Kitchens](https://hgiremodeling.com/outdoor-kitchens-spring-tx)
CONTACT US
[tel:832-802-7127](tel:832-802-7127)
[832-802-7127](tel:832-802-7127)
Mon - Fri: 09:00 AM - 05:00 PM
HGI Remodeling
20212 Champion Forest Dr, STe 700-154, Spring TX 77379
Serving Spring, TX & Surrounding Communities
Proudly serving homeowners throughout Spring, Conroe, Magnolia, Montgomery, Tomball, Cypress, The Woodlands, and Nearby North Houston Communities
Social
[Facebook](https://www.facebook.com/HGIremodeling/)
[Twitter](https://twitter.com/hgiremodeling)
[Instagram](https://www.instagram.com/hgiremodeling/)
[Pinterest](https://www.pinterest.com/hgiremodeling/)
[Yelp](https://www.yelp.com/biz/hgi-remodeling-spring)
[Houzz](https://www.houzz.com/professionals/kitchen-and-bath-remodelers/hgi-remodeling-100-satisfaction-guaranteed-pfvwus-pf~344909749)
```json
{
"@context" : "https://schema.org",
"@type" : "BlogPosting",
"author" : {
"@type" : "Person",
"name" : "HGI Remodeling",
"url" : "https://hgiremodeling.com/blog/author/hgi"
},
"dateModified" : "2026-08-10T22:17:07.059Z",
"datePublished" : "2026-08-10T17:00:00.000Z",
"headline" : "Aging in Place Bathroom Remodel: 2026 Planning Guide",
"image" : [ "https://hgiremodeling.com/hubfs/Screenshot%202026-08-10%20at%203.56.12%20PM.png" ],
"mainEntityOfPage" : {
"@id" : "https://hgiremodeling.com/blog/how-to-plan-an-aging-in-place-bathroom-remodel",
"@type" : "WebPage"
},
"publisher" : {
"@type" : "Organization",
"logo" : {
"@type" : "ImageObject",
"url" : "https://hgiremodeling.com/hubfs/Hgiremodeling_October2024/Images/logo-dark.svg"
},
"name" : "HGI Remodeling"
}
}
```